
Complete Amatures Guide For Building Soft66Lite SDR Kit
In this article I try to describe building Soft66Lite SDR kit as detailed as possible and with complete soldering tips that any person would be able to build it, even without previous soldering experience. It will be dedicated UVB-76 receiver but quite easily adjustable for any other frequency. So let's start with buy list! Here's what you will need:
-
Soft66Lite kit itself. Buy it from http://zao.jp/radio/66lite/ . I suggest you buy it with registered mail, because guy isn't that good with communicating and just got my money refunded with a note "I not ship to your country without registered mail". Must be language barrier I guess. Kit arrived in few weeks from Japan to eastern Europe, I'd say Japanese post is awesomely good.
-
Soldering iron. If you don't have one, get one with 40W power and quite thin tip (1-1,5mm should do). No need for fancy stuff, of course getting soldering iron with adjustable temperature wouldn't hurt for future projects.
-
Components for UVB-76 frequency, including 4608kHz crystal oscillator, mini-inductors L1,L3=0.22uH L2=27uH and capacitors C1,C3=5600pf C2=47pf. All of them are available at Laid's gift shop for low price since they might be a bit hard to find, especially crystal oscillator of such value.
-
Solder and flux. Soldering wire of 1mm diameter and less will do nice. It will possibly have some flux inside it, but that won't be enough, especially for soldering ICs (chips). There are quite wide variety of fluxes, I suggest you buy liquid one since it's way easier to work with. Rosin one is okay but you will have to clean it after soldering with alcohol (there are some specialized liquids for that available at shops). If you don't want to do that - go for "No Clean Flux".
-
3,5mm male to male stereo audio cable for connecting your kit to PC's line in.
-
External PSU (Power Supply Unit) with about 12V and 500mA output and socket for its plug to mount on SDR board. You can use your PC to power it if you have external bracket on it's back with molex connector.
-
Some case and plug for an antenna. Use your imagination there, I used slaughtered HDD case, one person used paper (!) to make a box - gluing one layer after another makes quite sturdy box. Or just buy one.
-
You might want "third hand" thing which looks like this to make working easier, especially with small parts. It's easy doable without it though.
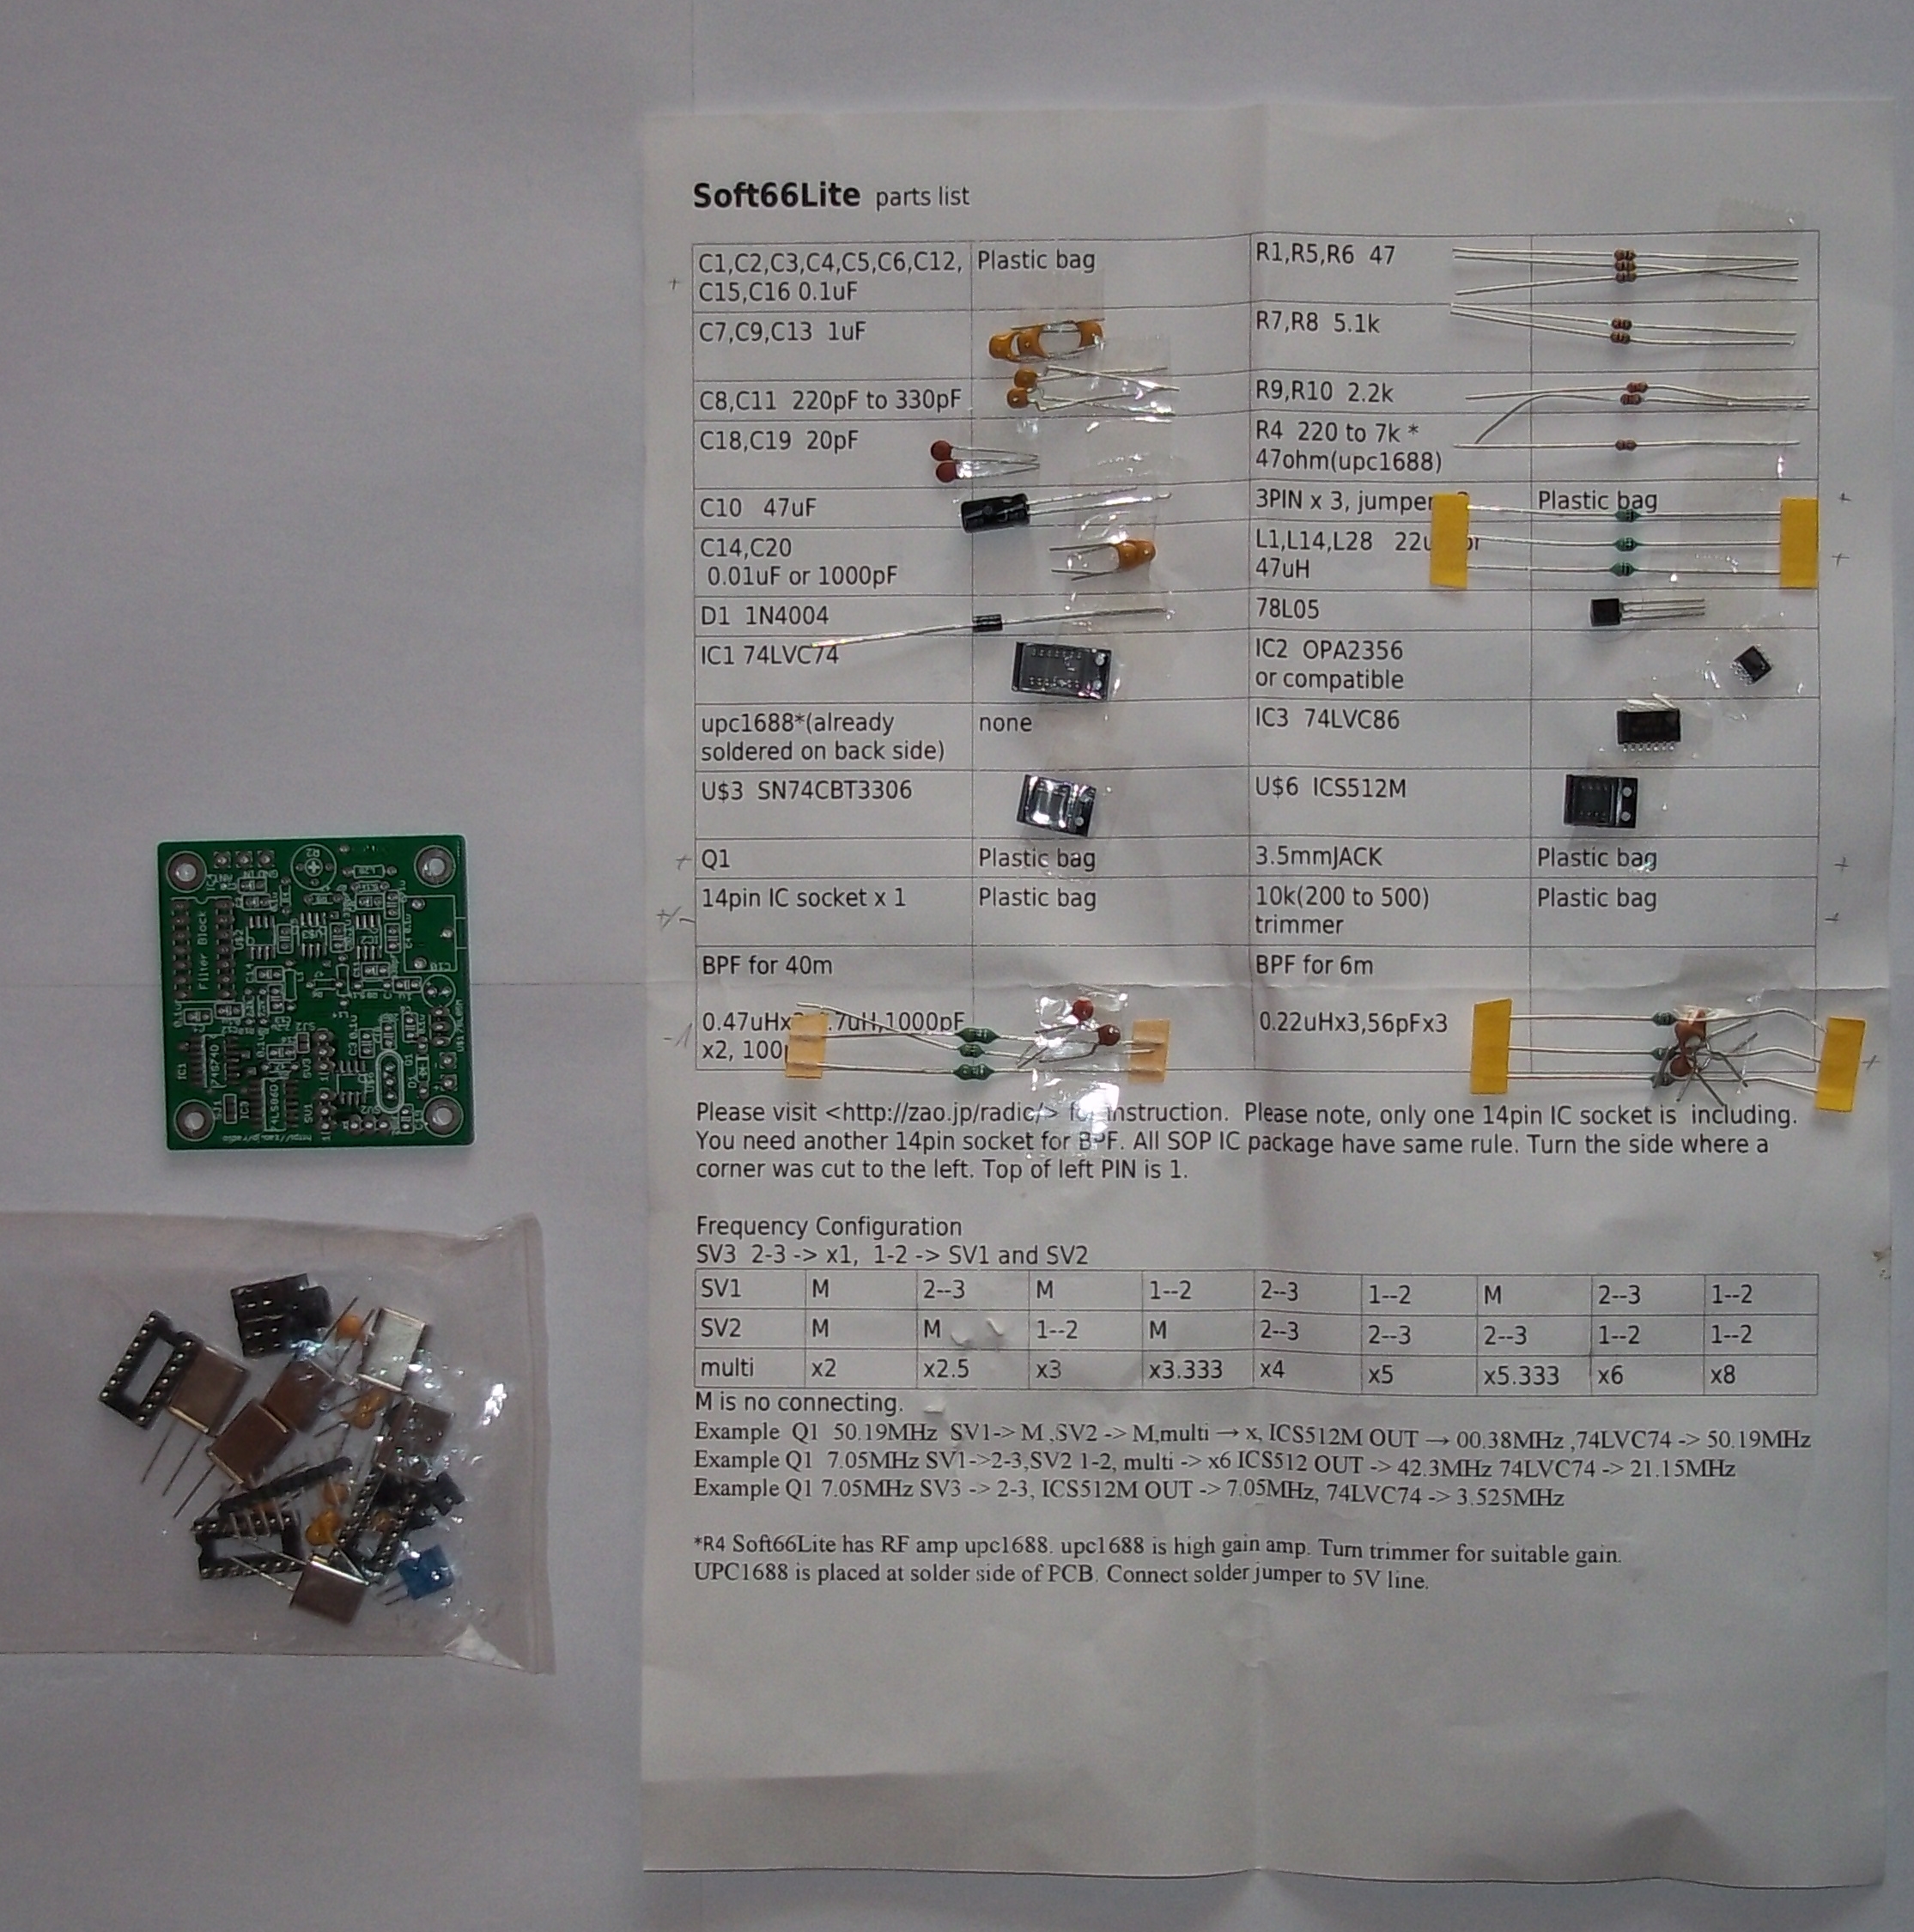
That pretty much sums the buy list, so let's go with next step - soldering. So few weeks later you get an envelope and that's what you find inside:
So unpack it and go for fun - soldering those chips. There are few soldering techniques for it very well shown here , here and here. And don't worry if you soldered multiple pins together (got a bridge) - it's easily corrected like this or removing excess solder with a soldering wick. You might want to read read an article called "How to solder like a pro" before beginning. Mostly important is to use enough or even more than enough of flux - it assures nice and clean joints. Actually, if you cover parts before soldering they stick together faster and easier which means they get less heated (and overheating is a bad thing). So let's start with IC3 chip. Align it by the "bubble" on it (which marks first leg). Done ? then go soldering rest of the chips. Be extremely cautious with IC1 because it doesn't have bubble or line to mark its pin-out - one of its edges is slightly bevelled as seen in this picture
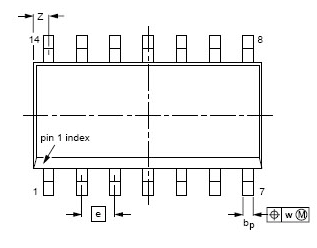
Which means that edge has to be pointing away from IC3 (towards the edge of board). If you have any doubts of positioning parts see complete board image at the end of this article!
Next go all the resistors, then all the capacitors and all other parts you have. I'm sure you will find soldering them very easy after you're done with those chips. Just stick them into their places by their number, apply flux, solder them and trim their legs. Just don't bend their legs by component itself, leave at least few millimeters, that's way you won't break them off. Of course checking their values before soldering with a multimeter won't hurt.
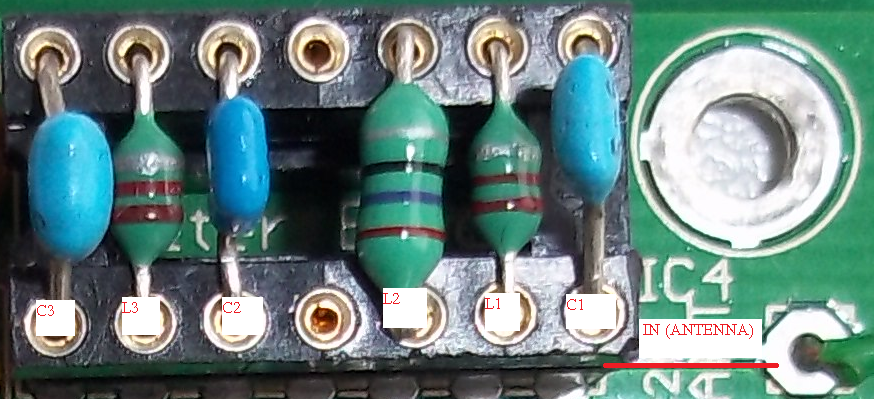
Then goes the band-pass-filter. You can solder its parts directly to board, but then you will lose ability to rework your kit to other frequency so it's up to you. Filter block should look like this (these parts don't have polarity):
So after you're done will all the soldering you will have board looking like this:
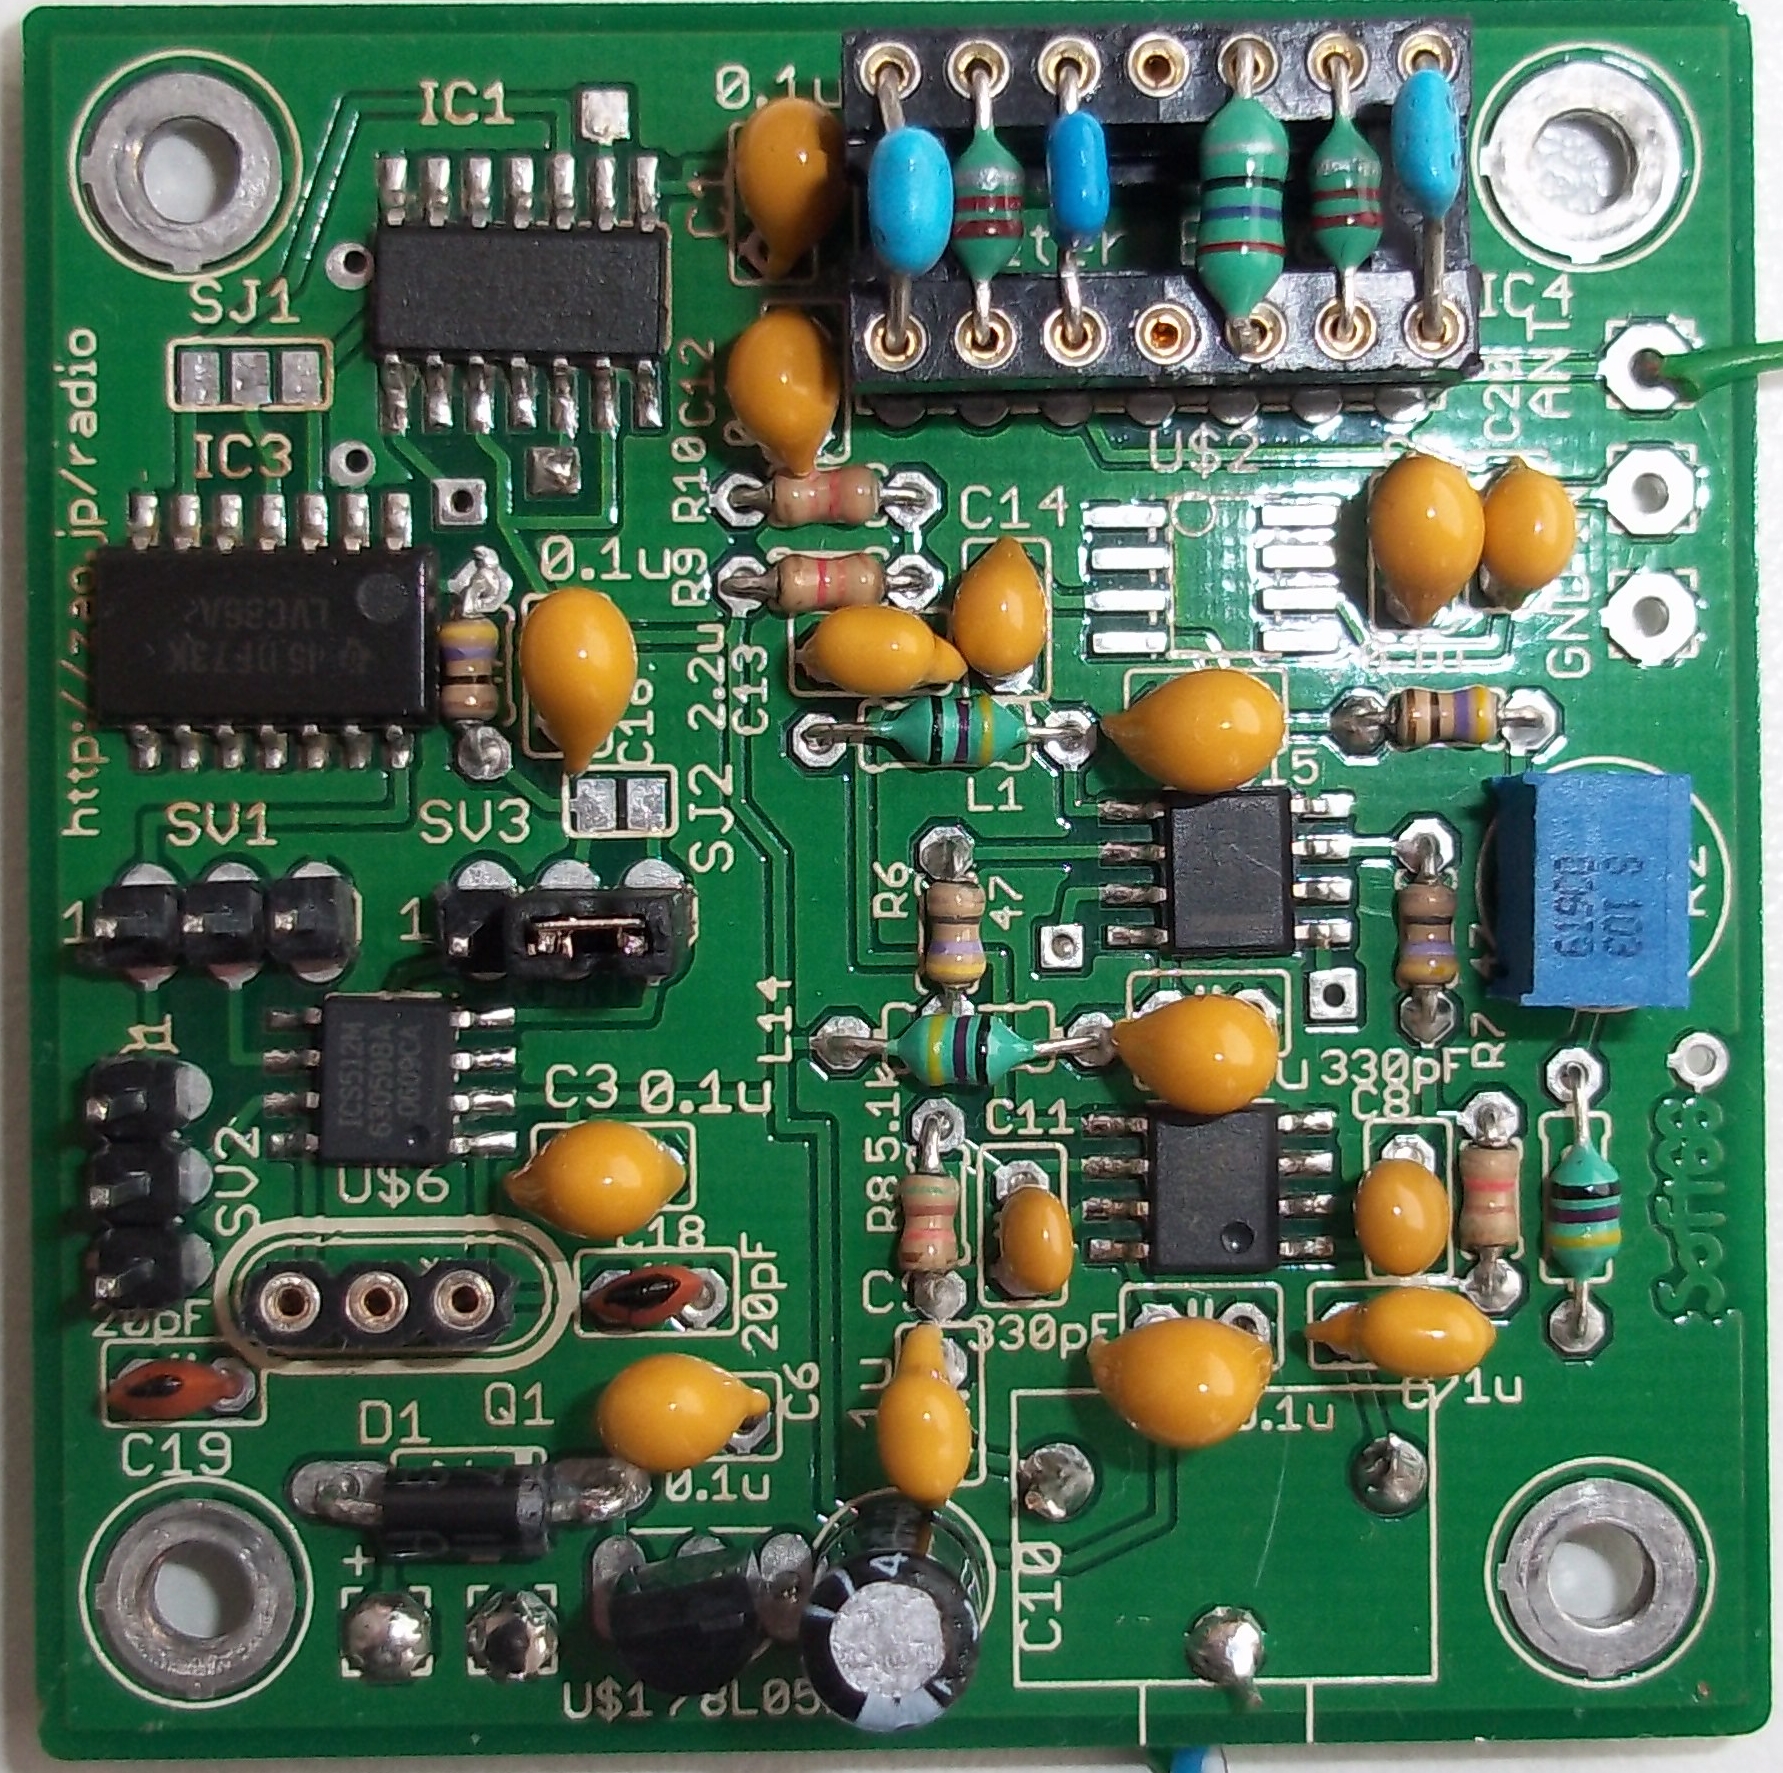
Note how jumpers are positioned - SV3 pins 2 and 3 are connected and SV1/SV2 aren't connected. That gives you x1 multiplier (or no multiplying for that matter). This kit has quite a few options for multiplying and even dividing your crystal's frequency. So that's it with soldering the kit itself, just think some case for it, connectors and you are ready play with it.
If you will want to rework it for other frequencies you will have different band-pass filter and crystal oscillator (or get your wanted frequency with SV1/2/3). Parts values for filter can be calculated here . Just enter desired frequency, bandwidth (192kHz or more, adjust it until you get more or less standard values for parts. If you happen to have LCR meter or multimeter with such function you can buy components with +/- values of 10% or even 20% percents and get exact values you need even if they are not that standard.
And then it's time to test it. If you already have antenna it's a bit easier, if not - you will need some long wire, preferably going outside though window. So install one of SDR programs (HDSDR or SDR-RADIO is what I prefer) and go for it! Set the center frequency (4608kHz) and you should see something like this:
Sdr_img_03.png
Not seeing it? Not a big problem, adjust that trimmer on the board (R2). I find its value of ~200ohm best for the buzzer if R4 value is 47ohm. And that's all, you should have fully working UVB-76 dedicated SDR receiver by now. Hopefully this article was useful, you had fun and got some new skills. Cheers!
P.S. if you run into problems other than just not working - check this out (different kit, common problem) or just ask on UVB-76 forum.